把玩 Spring Security [3] 拼上最後一哩路 AuthenticationProvider
- notes spring-security
拼上最後一哩路 AuthenticationProvider
我們即將進入多數 Spring Security 帶你入門的文章或教學範例起手式的地方:AuthenticationManager。說到「即將」,只是先開始有個念頭,實際上由前二篇的概念解說,你會發現即使沒有 AuthenticationManager 依然能驅動 Spring Security 並進行權限控管 (Authorization)。AuthenticationManager 的角色只是提供一個管理的介面,來選擇適當的 Authentication。
我們能簡單地想,AuthenticationManager 是認證領域中的 Plugin Manager,世上有千奇百怪的驗證方式,若是接下來要使用的驗證方式是「已經」有個善心人士實作過的,不管他是來自 Open Source 專案,或是公司內舊專案複製出來的程式片段。只要他們向 AuthenticationManager 宣示自己的存在,並加入 Security Filter 的責任鏈參與認證流程即可。
對於 Web Application 來說,能用來進行 Authentication 的材料並不是什麼特別的存在,它就是一個 HTTP REQUEST 中能提供的內容罷了。我們利用 curl -v 來顯示他發出去的 HTTP REQUEST 與得到的 HTTP RESPONSE:
curl -v http://127.0.0.1:8787/info
*   Trying 127.0.0.1...
* TCP_NODELAY set
* Connected to 127.0.0.1 (127.0.0.1) port 8787 (#0)
> GET /info HTTP/1.1
> Host: 127.0.0.1:8787
> User-Agent: curl/7.58.0
> Accept: */*
>
< HTTP/1.1 403
< Set-Cookie: JSESSIONID=F5EA6B3A51BEECB1C4B4661AC9BDA563; Path=/; HttpOnly
< X-Content-Type-Options: nosniff
< X-XSS-Protection: 1; mode=block
< Cache-Control: no-cache, no-store, max-age=0, must-revalidate
< Pragma: no-cache
< Expires: 0
< X-Frame-Options: DENY
< Content-Type: application/json
< Transfer-Encoding: chunked
< Date: Wed, 29 Sep 2021 10:50:22 GMT
<
* Connection #0 to host 127.0.0.1 left intact
{"timestamp":"2021-09-29T10:50:22.825+00:00","status":403,"error":"Forbidden","path":"/info"}
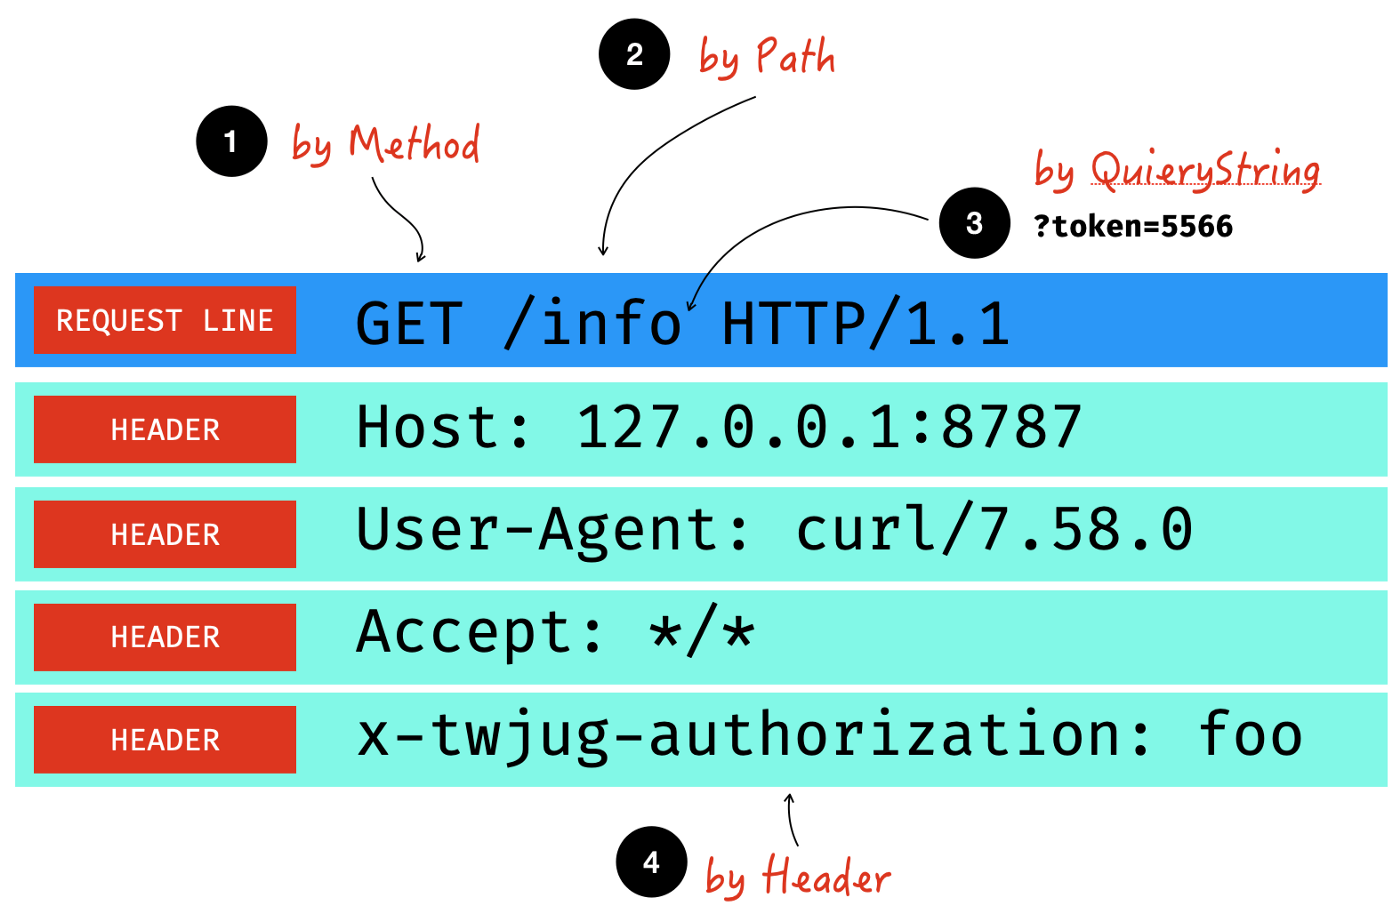
只要是 HTTP REQUEST 提供的資訊都可以被用來作為 Authentication 的材料,例如:
- URL 的 Query String
- REQUEST HEADER
以 Amazon Web Services (AWS) 為例,它有一套演算法能針對 API Request 進行「簽署 (signing)」,透過這個演算法產生的「簽名 (signature)」能被 AWS 的 API Server 用來驗證 (Authenticate) 是不是他要存取的資源,屬於某一個使用者或某一個組織,並且有授權呼叫方使用。
AWS 的 Signature 有二種常見的位置,第一種就是 URL 的 Query String,像是我們替 S3 Object 產生一個短暫有效的下載連結,它就是將 Signature 等認證資料放在 Query String 的位置。而其他 AWS 的 API 呼叫,多放在 REQUEST HEADER 中,並且是常見的 Authorization Header。
GET https://iam.amazonaws.com/?Action=ListUsers&Version=2010-05-08 HTTP/1.1
Authorization: AWS4-HMAC-SHA256 Credential=AKIDEXAMPLE/20150830/us-east-1/iam/aws4_request, SignedHeaders=content-type;host;x-amz-date, Signature=5d672d79c15b13162d9279b0855cfba6789a8edb4c82c400e06b5924a6f2b5d7
content-type: application/x-www-form-urlencoded; charset=utf-8
host: iam.amazonaws.com
x-amz-date: 20150830T123600Z
Security Filter 的責任
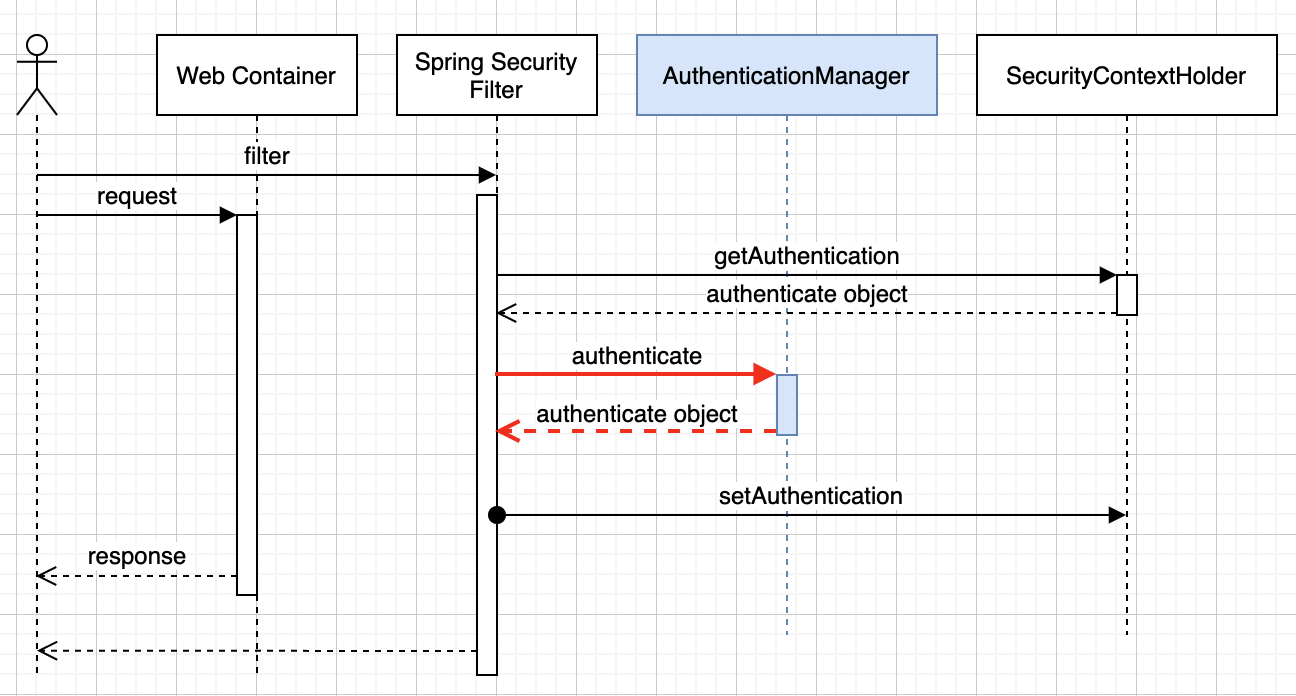
理解了認證需要的材料來源後,我們來重新理解一下能取得 HTTP REQUEST 的 Security Filter 該做些什麼。在先前我們實作的是不太負責的 Security Filter,作為參與 Authentication 的一份子,它其實有一些責任要負的。我們用虛擬碼的型式來描述一下:
doFilterInternal(req, resp, filterChain) {

  // 檢查使用者有沒有認證過了
  if (hasAuthenticated()) {
    filterChain.filter(req, resp);
    return ;
  }

  // 查看 HTTP REQUEST 中有沒有可以用來認證的資料
  Authentication requestToken = asAuthentication(req);

	// 沒有可以用的認證資料,那就是別人家的事了
  if (requestToken == null) {
    filterChain.filter(req, resp);
    return ;
  }

  // 交給 Plugin 大總管,詢問各別 plugin 有沒有辦法做
  Authentication auth = authenticationManager.authenticate(requestToken);

	// 沒有人通過認證
  if (auth == null || !auth.isAuthenticated()) {
    filterChain.filter(req, resp);
    return ;
  }

  // 成功通過認證
	securityContext.setAuthentication(auth);
  filterChain.filter(req, resp);

}
這組虛擬碼,如果要把它表達成我們先前「不負責」的型式,那就是剩下最後一段:
doFilterInternal(req, resp) {

	Authentication auth = 不管誰來,我都生一個可以用的 Authentication;

  // 成功通過認證
	securityContext.setAuthentication(auth);
  filterChain.filter(req, resp);

}
所以,未完成的拼圖有 2 處:
- 由 HTTP REQUEST 取出認證資料,並用 Authentication 型別裝起來。(先前實作的
ApiToken算是有稍為摸到邊),最終目標是把轉好的 Authentication,讓 AuthenticationManager 提供驗證結果。 - 向 AuthenticationManager 提供 AuthenticationProvider 來達成轉換 Authentication 的功能
認證情境
概念解說先告一段落,我們來設計一個實際的驗證方法體驗一下流程。
我們的認證資料會放在
x-twjug-authorizationHeader 內,它是一個神秘的 token,沒有人知道規則。不過,我們有個祖傳的 map 記錄了 token 對應到哪個使用者。
白話地說,我們會抓出 HTTP REQUEST 的 x-twjug-authorization Header 轉成 Authentication 物件,也就是 asAuthentication 方法:
Authentication requestToken = asAuthentication(request);
if (requestToken == null) {
    filterChain.doFilter(request, response);
    return;
}
實作起來相當直覺 (這裡順便替 ApiToken 加了新的建構子來傳入 token 內容):
private Authentication asAuthentication(HttpServletRequest request) {
    String token = request.getHeader("x-twjug-authorization");
    if (token == null) {
        return null;
    }
    return new ApiToken(token);
}
而祖傳的 map 只是我們簡化了資料庫或外部資料讀取的情境罷了。
拼圖之一:完成 Filter 實作
僅僅是將虛擬碼轉成實際的 Java 程式:
protected void doFilterInternal(HttpServletRequest request, HttpServletResponse response, FilterChain filterChain) throws ServletException, IOException {
    if (hasAuthenticated()) {
        filterChain.doFilter(request, response);
        return;
    }

    Authentication requestToken = asAuthentication(request);
    if (requestToken == null) {
        filterChain.doFilter(request, response);
        return;
    }

    Authentication authentication = authenticationManager.authenticate(requestToken);
    if (authentication == null || !authentication.isAuthenticated()) {
        filterChain.doFilter(request, response);
        return;
    }

    SecurityContextHolder.getContext().setAuthentication(authentication);
    filterChain.doFilter(request, response);
}
拼圖之二:提供 AuthenticationProvider
AuthenticationProvider 即為要向 AuthenticationManager 註冊的 Plugin,單純有 Filter 還不算完工是因為,我們還沒提供實際的驗證方法:
Authentication authentication = authenticationManager.authenticate(requestToken);
不像在第一篇時,我們硬是 hard-code 了任何人都通過,這回我們來嚴肅一點,好好把它做出來唄!只有簡單的二步:
- 實作 AuthenticationProvider
- 註冊 AuthenticationProvider
實作 AuthenticationProvider 介面只有 2 個方法,一個是決定哪一個實際的 Authentication 類別是需要支援的,以我們的例子就是 ApiToken:
public class TwjugAuthenticationProvider implements AuthenticationProvider {

    @Override
    public Authentication authenticate(Authentication authentication) throws AuthenticationException {
        System.out.println("returning Authentication: " + authentication);
        // TODO: convert the token in the authentication to user details
        return authentication;
    }

    @Override
    public boolean supports(Class<?> authentication) {
        return ApiToken.class.equals(authentication);
    }
}
這裡留了一部分
TODO,那其實就是要接上 祖傳 map 的部分
註冊 AuthenticationProvider,就是回頭修改 WebSecurityConfigurerAdapter 找利用 AuthenticationManagerBuilder 註冊我們新寫的 Plugin 即可:
@Override
protected void configure(AuthenticationManagerBuilder auth) throws Exception {
    auth.authenticationProvider(new TwjugAuthenticationProvider());
}
重點摘要
本篇是把玩 Spring Security 的最後一篇,運用了「客製化 AuthenticationProvider」的方式,理解了 Security Filter 與 AuthenticationProvider 的互動。當我們自行實作過一回,AuthenticationProvider 後,我們拿到「別人」寫的好函式庫時,就知道要讓它正確運作要事情是:
- 向 AuthenticationManager 註冊自己
- 註冊新的 Security Filter 來轉換 Authentication 並轉交給 AuthenticationManager 使用
當使用不同的驗證方式遇到困難時,就以上述二個大方向著手:
- 在 Spring 啟動 log message 應該要能看得到新的 Filter 的順位
- 知道 Debugger 的 breakpoint 可以下在 Filter 與 Provider
再配合各種「驗證方法」自身的領域知識,那就能掌握多數的使用情境囉!
本篇的範例碼,請參考 lab3 分枝: https://github.com/qrtt1/learning-spring-security/tree/lab3